Audio Features and Settings
Audio Inputs
The RØDECaster Video allows you to manage, process, route and adjust a wide array of audio inputs. Below is a brief summary of each:
Combo 1 & 2: These are the combo inputs on the rear of the RØDECaster Video, capable of accepting either XLR inputs such as microphones and 1/4-inch TRS inputs such as instruments and line level signals.
Wireless 1 & 2: The RØDECaster Video features a dual-channel wireless receiver that allows you to connect up to two RØDE Series IV wireless transmitters, such as the Wireless PRO, Interview PRO, Wireless ME or Wireless GO II.
Video Clips: This is the audio from any video files that are loaded into your media library and used in your productions.
Sounds: This is the audio from any audio files that are loaded into your media library and used in your productions.
HDMI 1–4*: Any audio sent from devices connected to the RØDECaster Video’s four HDMI inputs (from a camera, for instance) will be sent to these four inputs.
Bluetooth: This is the audio from Bluetooth devices, such as smartphones, that are paired with the RØDECaster Video.
USB 1: This is the audio sent from your computer connected to the RØDECaster Video’s USB 1 input. Select “RØDECaster Video Stereo” or “RØDECaster Video Multitrack” in your computer or software’s audio output settings, depending on whether you’ve enabled multitrack recording or not.
USB 1 Chat: This is a second channel of audio sent from your computer connected to the RØDECaster Video’s USB Main input. It’s labelled ‘Chat’ as an example use case but can used in a wide variety of applications. Select “RØDECaster Video Chat” in your computer or software’s audio output settings.
USB 2: This is the audio sent from your computer, phone or other device connected to the RØDECaster Video’s USB 2 input. This is a secondary audio interface that is MFi-certified, meaning that it will work with iOS, Android, Windows and Mac devices – perfect for connecting smartphones.
USB 4 & 5: This is the audio from a RØDECaster Pro II, RØDECaster Duo or any RØDE USB microphones connected to USB 4 or 5.
Note
The four HDMI inputs are able to be split into dual mono channels – i.e. instead of a single stereo track, you can record the left and right channels separately. This is ideal if you have a dual-channel microphone system such as the Wireless PRO connected to your camera as you will be able to record, mix and process each channel separately.
Adjusting Audio on the RØDECaster Video
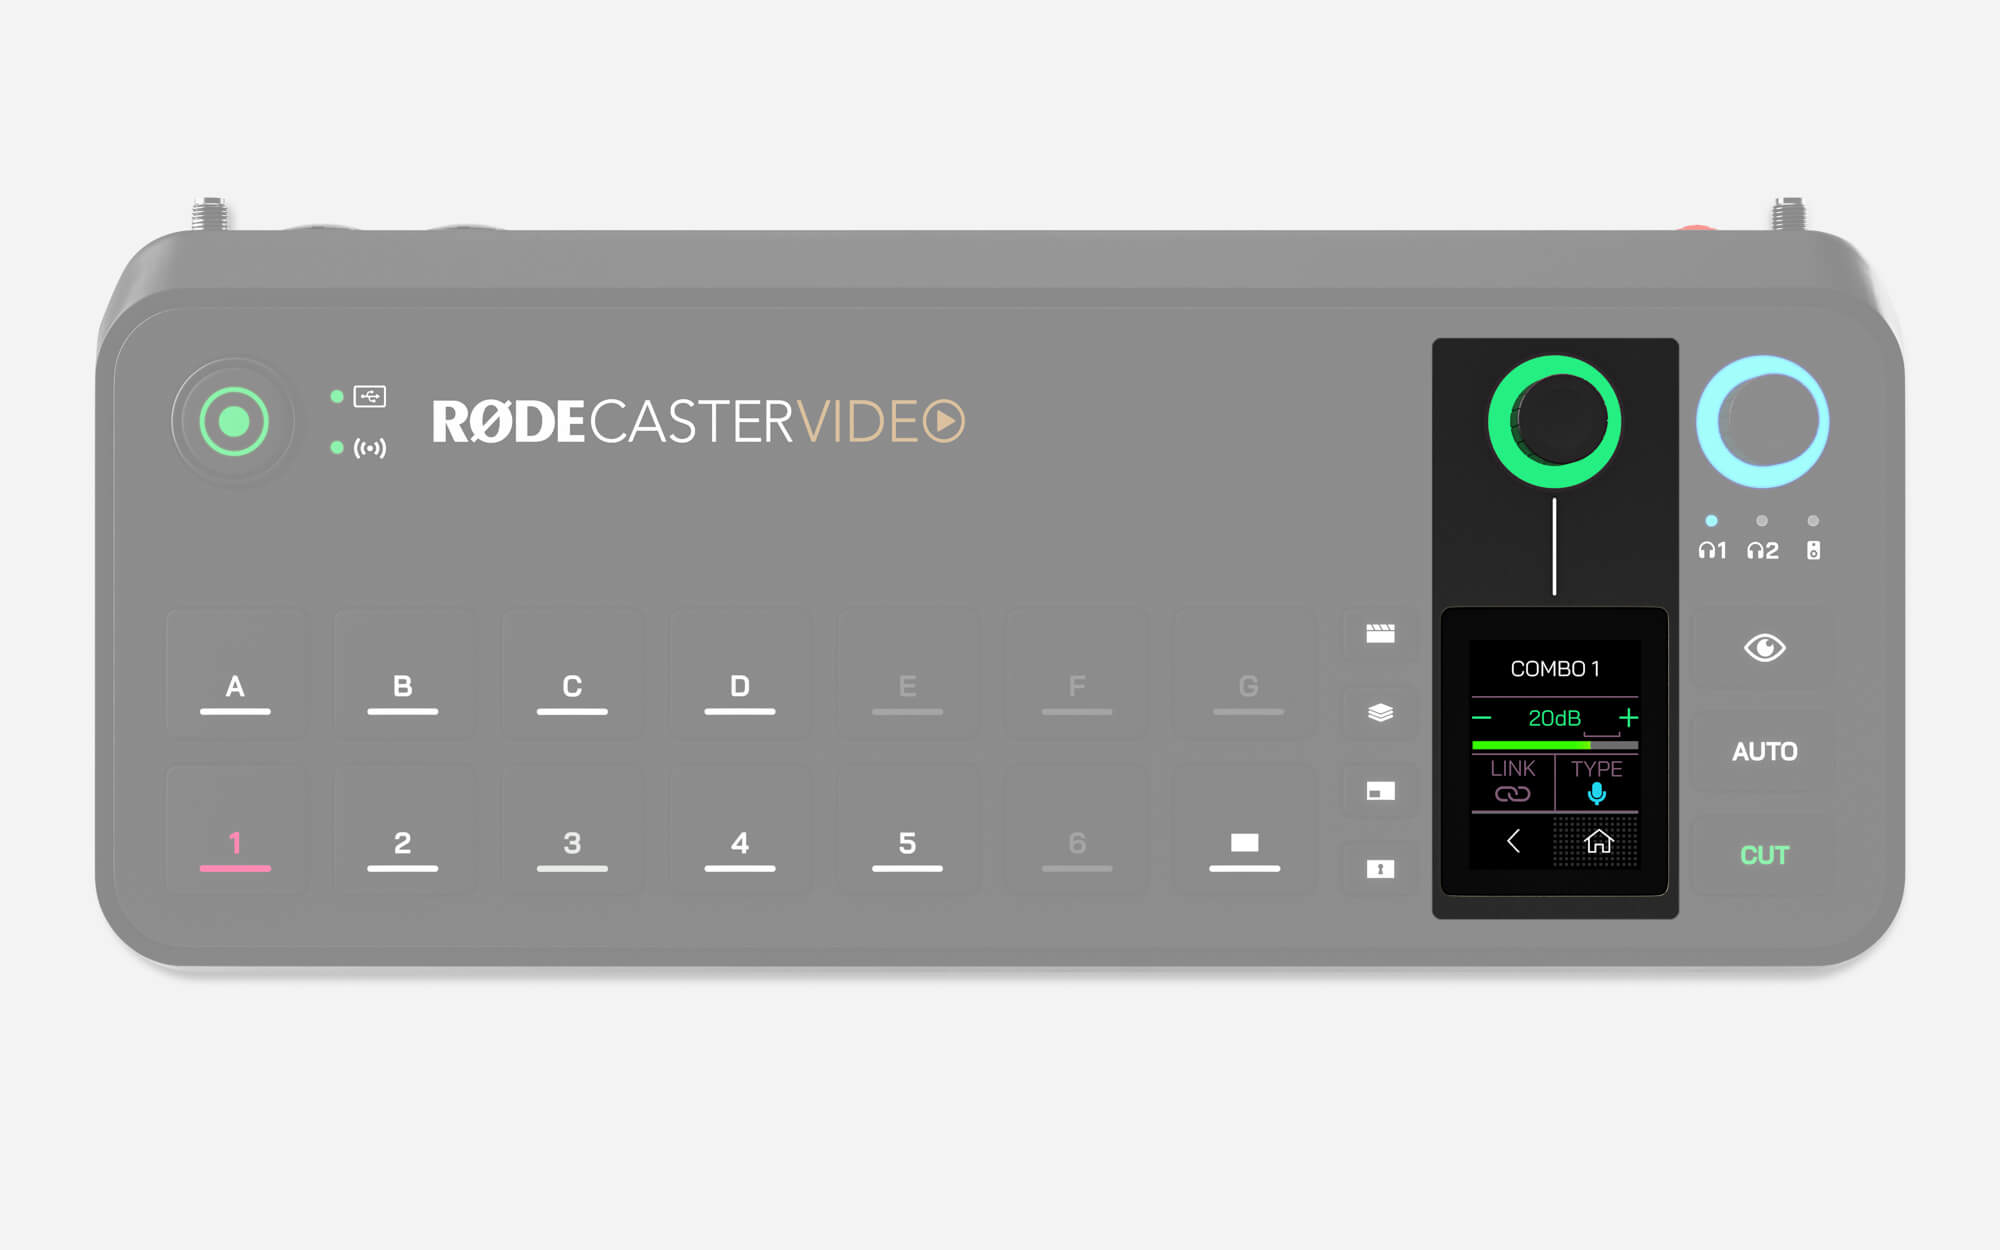
From the home screen, tap the bottom-right icon or click the encoder to access the audio mixer menu. Here, you can cycle through each of your audio inputs by using the encoder, click the encoder to adjust its volume level, and click again to continue cycling through inputs.
On each input page, tapping the top-right icon will allow you to adjust the VoxLab™ audio processing (Depth, Sparkle and Punch) for that input. Click the encoder to cycle through each of the three parameters and rotate the encoder to adjust their intensity. Press-and-hold the encoder to enable or disable this processing.
The settings cog icon on each audio input page will have different settings depending on what type of input it is. This menu allows you to select the condenser microphone preset to enable phantom power, pair your RØDE Series IV wireless transmitter, adjust input gain, link or unlink stereo pairs, and more.
If you scroll to the end of the list of your audio inputs, you’ll see the “Add or Remove Channels” option. This lets you select up to 9 audio sources from the list – simply click the encoder to select or deselect an input and click the back arrow when you’ve made your selection.
RØDE Central Audio Mixer
The Audio Mixer within RØDE Central allows you to configure, control and route all of your audio sources in one intuitive interface. Here, you can adjust the processing and levels for each audio input, as well as choose where it's routed, allowing you to create completely custom sub-mixes to send to different audio outputs such as your livestream, your recording, and your own monitoring headphones.
.jpg)
Adding and Adjusting Audio Inputs
Click the ‘+’ button in the Audio Mixer window and select your desired audio input from the dropdown list to add it to the mixer. Once added, you can adjust an input’s volume level with the on-screen fader, enable Mute or Listen with the two buttons below the fader, and access processing and other input settings by clicking the icon above the fader.
You can rearrange the order of the audio inputs by clicking and dragging the top-left corner of the channel, and you can remove an input by clicking the X in the top-right of the channel.
Mute
This button will mute the associated channel on the output that you currently have selected in the Audio Output Menu. When a channel is muted, the button will be illuminated red.
Listen
The Listen (or ‘Solo’) button allows you to monitor the audio from a channel by itself in Headphones 1, without the rest of the audio mix.
-2374x1367-9a82363.jpg)
Adjusting and Mixing Audio Outputs
The Audio Output Menu in the top-left of the Audio Mixer allows you to select any of the RØDECaster Video’s digital or analog audio outputs and customise which audio inputs are sent to it. Selecting an output from the dropdown will show you the mixer screen for that output. When selecting one of the outputs, you will see a toggle that will contain options such as Live Mix, Custom and Mix Minus.
Live Mix
Choosing “Live Mix” will simply mirror all of the settings in the main “Live Mix” output, which is your master mix.
Custom
Selecting “Custom” allows you to create a custom mix for the selected output, allowing you to adjust the volume levels of each of your inputs separately to your master “Live Mix”. This means you could have a completely different mix in your headphones to your live stream, for instance. See the below section on ‘Linking’ for more information on how custom mixes interact with the main “Live Mix” output.
Mix Minus
The “Mix-Minus” option appears for digital audio outputs that can also double as inputs, such as USB or Bluetooth. This uses the same settings as the main “Live Mix” output but excludes the selected channel’s input (USB 1’s input on USB 1's output channel, for instance) in order to avoid feedback or echo.
-2374x1364-f5ebe03.jpg)
Linking in Custom Mixes
When configuring a “Custom” output mix, each volume fader is ‘Linked’ to the master “Live Mix” by default – this is useful if you want a certain sound to be quieter in your headphones than in the main mix, but you’d still like to adjust both volume levels with a single fader. You can toggle this setting by clicking the blue ‘Link’ button below each fader.
When linked, adjusting individual levels in a custom mix will create offset levels that are relative to the fader in the main “Live Mix” output. This means that any fader adjustments on the main “Live Mix” output will increase or decrease the custom mix level but with this offset maintained. When unlinked, fader levels in a sub-mix will not change when the associated channel is adjusted in the main mix.
-2374x1362-2b456fe.jpg)
Input Settings
In the Audio Mixer, clicking on an input’s icon will open a pop-up with various settings you can adjust for that input. This includes:
- Input gain level: This control allows you to adjust the input gain of your audio source. This can be used to balance microphones, devices, instruments and other sources that don’t output similar volume levels, allowing you to use the volume faders to get a better idea of relative levels between sources.
- Microphone presets for Combo 1 and 2 inputs: This setting allows you to select a preset based on the type of microphone or input you’re using that will adjust a number of settings to best suit the input. You’re also able to stereo link (see below) Combo inputs 1 and 2 for use with stereo microphone setups, instruments, mixers or other line-level equipment.
- Phantom power (P48) for Combo 1 and 2 inputs: If your microphone requires phantom power (as most condenser microphones do), you can enable or disable it using this this toggle.
- Pair button for Wireless 1 and 2 inputs: This button allows you to pair a RØDE Series IV wireless transmitter to the RØDECaster Video’s Wireless 1 and 2 inputs, including the Wireless PRO, Interview PRO and more. Simply enter the transmitter into pairing mode and then press this button to pair.
- Stereo Link or Unlink buttons: Various inputs allow you to configure them as either stereo or dual mono inputs, such as the HDMI and Combo inputs. For the HDMI inputs, this can be useful if you’re using a camera with a dual-channel wireless system (such as the Wireless PRO) with your camera, you will be able to record, mix and process each channel separately.
- Processing: See below for more information on the RØDECaster Video’s audio processing capabilities and settings.
.jpg)
VoxLab™ Audio Processing
VoxLab™ is the default audio processing editor for the RØDECaster Video – in the Input Settings window, click “Processing” to enable the effects and simply adjust the three knobs to taste – "Depth", "Sparkle" and "Punch". This simple interface is incredibly intuitive and allows you to achieve professional sound quality with ease, with each control adjusting multiple parameters on multiple processors.
Depth: Use this to subtly enhance the low end of your signal, giving it more richness and tighter bass articulation.
Sparkle: Use this to add brightness and detail to your signal, which is perfect for giving your voice more presence and clarity.
Punch: Use this to add subtle compression to your signal, making your voice sound more intelligible and natural. It will also adjust the noise gate to help reduce background noise.
Advanced Audio Processing
Clicking the “Advanced” button in the processing screen gives you access to granular control over a range of audio processors, and also allows you to enable or disable each processor individually.
High-pass Filter
Use this to help further reduce background noise in your recording or add some presence to a muddy voice or vocal track. This is achieved by cutting low-end frequencies below a certain cut-off frequency.
De-esser
Use this to tame sibilance in your voice. Sibilance is a “hissing” sound that occurs naturally in human speech and is caused by consonants, mainly ‘s’ (hence the name “de-esser”). This is essentially a compressor that targets a certain frequency to reduce its presence in a signal.
Noise Gate
Use this to help reduce background noise in your recording, such as air conditioners, chatter in another room or traffic outside. This is very handy if you are recording in a space that is not acoustically treated.
Compressor
Use the compressor to make your voice (or any other audio source) sound smooth and balanced. This is achieved by bringing down (or “compressing”) the loudest peaks in the signal, while boosting quieter parts so that it is more even.
Equaliser (EQ)
Use this to fine-tune the tonality of your voice or audio source. This is a three-band parametric EQ, which allows you to boost or cut bass, mid and treble frequencies at any frequency range that you choose.
Panning
Use this to pan your audio across the stereo field (when channels are stereo linked, they are automatically hard panned left and right).
Big Bottom™
Use this to give your voice or audio more depth without creating muddiness. This is achieved by adding subtle harmonics to the low-end frequencies in your signal, giving it more “punch”.
Aural Exciter™
Use this to bring out more detail and clarity in your voice or audio source. This is achieved by adding subtle harmonics to the higher frequencies in your signal, giving it more “sparkle”.
Master Compellor™
The RØDECaster Video features a master compressor modelled after the revered APHEX Compellor. Unlike the other processing, this affects the entire output signal and is useful for “gluing” all your audio channels together and making your mix sound more balanced. To access this, navigate to the Audio Mixer in RØDE Central and click the Master Compellor icon (next to the Audio Output Delay icon).
Note
This function only applies to outputs that are configured to use the Live Mix, it won't be applied to custom sub-mixes.
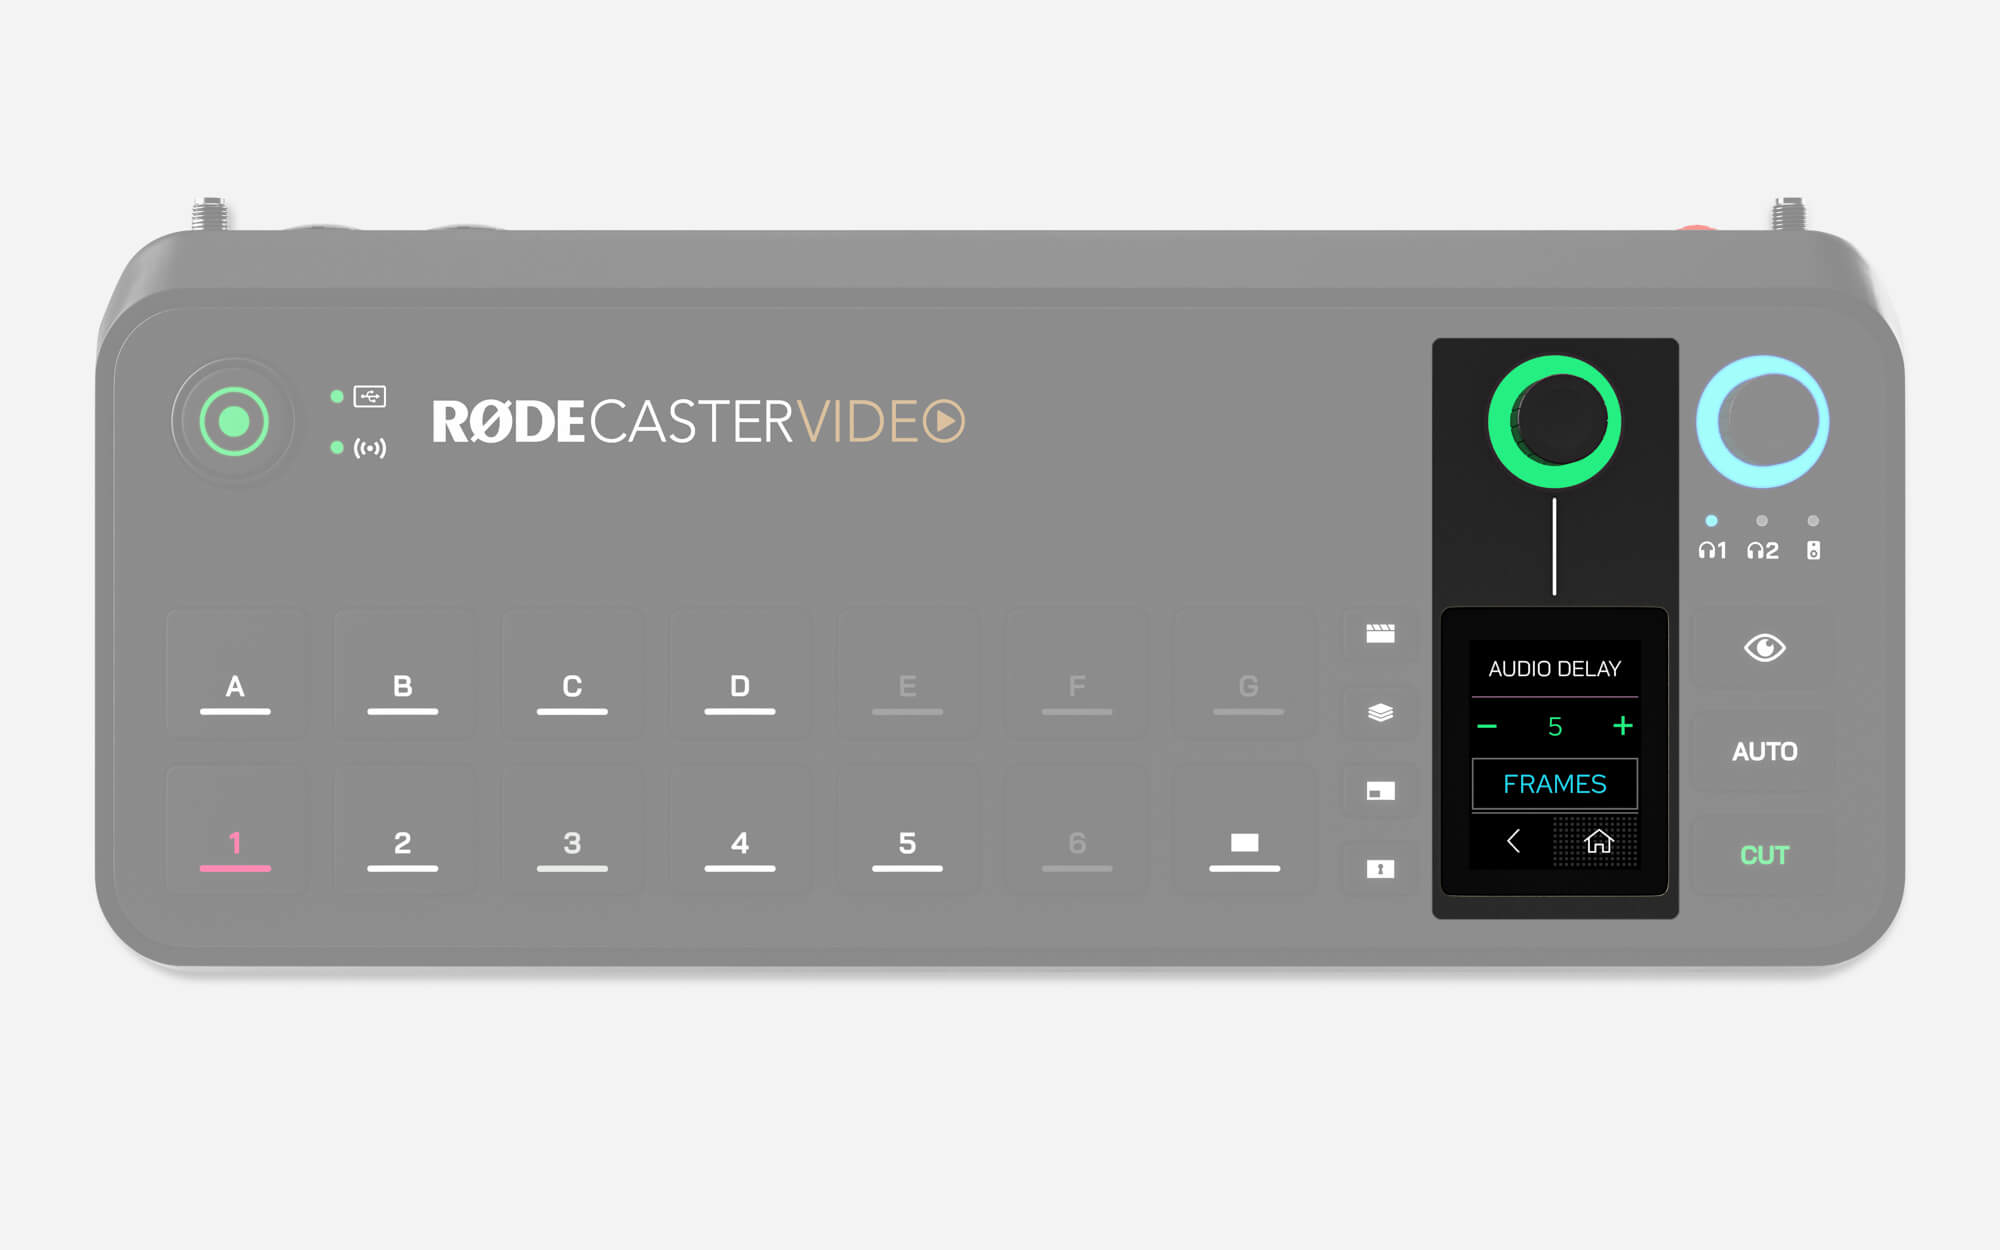
Audio Output Delay
Generally speaking, any camera (or other video device) will have a slight delay present in its video feed. The delay from audio devices, however, is typically much lower. To help combat this difference, the RØDECaster Video features an audio output delay function, which allows you to perfectly sync your audio with your video on your live stream and recording.
By default, the delay will be set to 5 frames, which should accommodate for the widest possible range of cases, but you can fine tune this setting on the RØDECaster Video by heading to Settings > Audio Delay, or via the Audio Mixer in RØDE Central. You can adjust the delay in increments of 1 millisecond or 1 frame.
How to Measure Audio Output Delay
To determine how much delay is suitable for your setup, you’ll only need to perform the following process once:
- Make sure your RØDECaster Video and all your video devices are set to the same frame rate
- Record a quick clip of yourself clapping on-camera, ensuring you also record the audio
- Eject your USB storage device, connect it to your computer, and bring across your video file into your NLE (Non-linear Editor) of choice, such as DaVinci Resolve or Adobe Premiere Pro
- In your NLE, find the video frame in which your clap occurs, and look for the spike in audio in your waveform
- On your timeline, highlight the difference between the audio spike of the clap and the visual of the clap to measure the delay (either in frames or milliseconds)
- Set your audio output delay to this number
Note
The audio output delay only applies to your live stream and recording – for the sake of monitoring your own voice live, the delay is not applied to your headphones or monitor speakers.
Scene Audio
Scene Audio is a feature that allows you to automatically mute any of your audio channels when switching to an input, scene or media button.
- Open the RØDE Central Scene Builder
- Select which input, scene or media button you wish to apply Scene Audio to
- Under the Scene Audio dropdown on the right-hand side, toggle off whichever audio channels you would like muted
Note
To differentiate between an audio channel muted by Scene Audio or by traditional mute, the icon will be amber rather than red. Scene Audio mutes will be overruled by manual mutes.