Building and Using Scenes
What is a Scene?
A scene is a configuration of multiple video and/or media sources in a single layout that can be completely customised to your needs. This can be as simple as a picture-in-picture or split screen layout with two different cameras, or an intricate scene using multiple cameras, graphics, backgrounds and other media.
You can build scenes directly on the RØDECaster Video itself, or use the scene builder in RØDE Central for more advanced customisation. If you are in Instant mode, you’ll be building scenes using your live Program feed, which is great for quickly making simple scenes on-the-fly. In Studio mode they will be built in the Preview feed, so you can set up your scene in the background while something else is being sent to the live Program feed.
You can save a scene to one of the seven Scene buttons, which allows you to switch to them with a single button press, just like you would one of the Input buttons.
Building a Scene on the RØDECaster Video
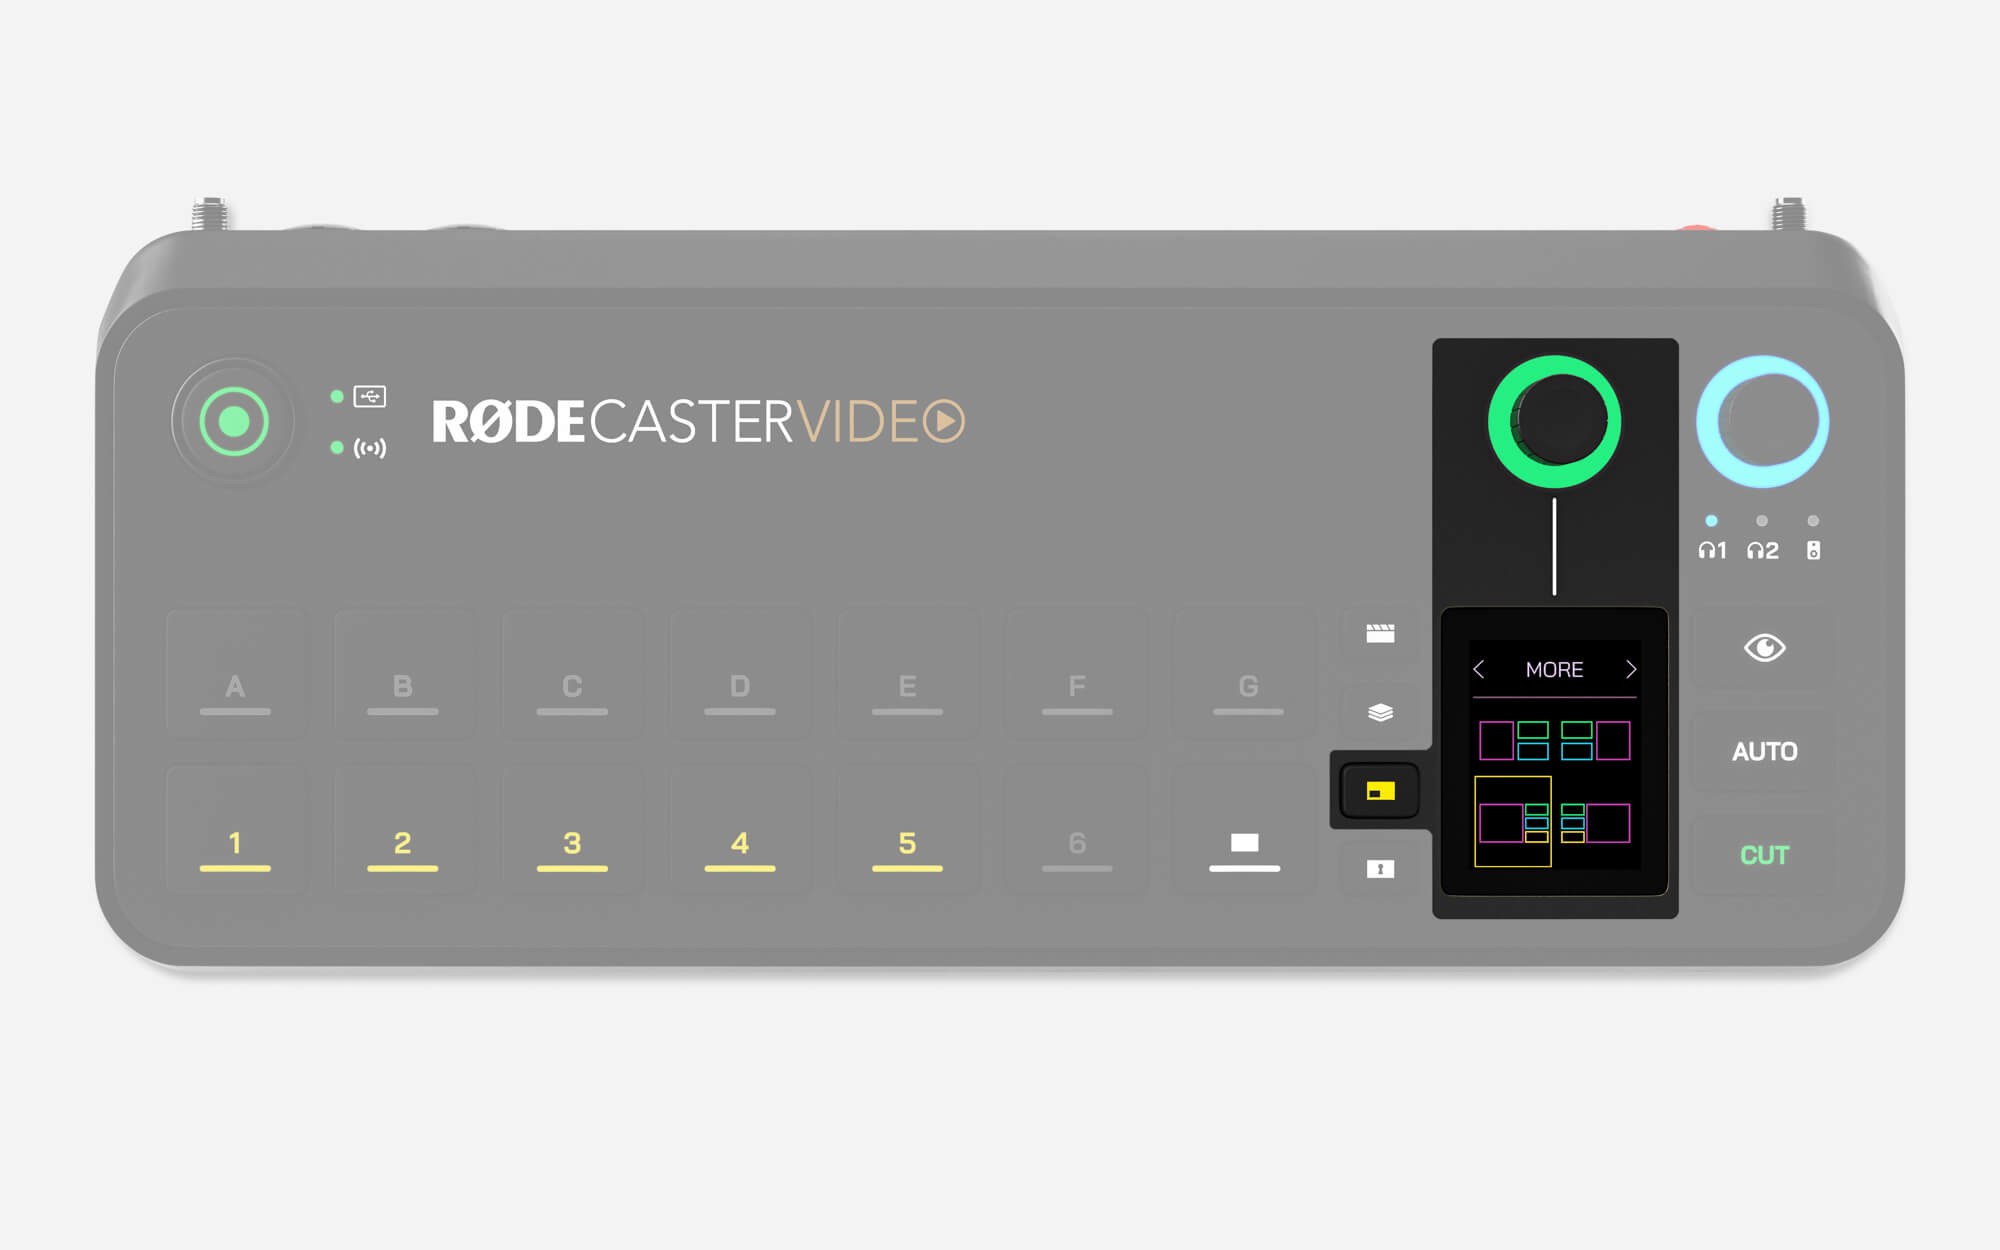
- Press the Multisource Function button
- Tap the top section of the screen and use the encoder to browse the various layouts, clicking the encoder to make your selection
- Use the encoder to choose which of the frames you will be selecting (A, B, C, D or BG for background)
- With a frame highlighted, press one of the six input buttons to assign it to that frame, or press the Media function button and then a Scene button to use an image or video from your media library
- Repeat this process until all of your frames are assigned then click the encoder or tap the green tick to confirm your scene
- To save your newly created scene, press-and-hold an empty (unlit) scene button (see below if you don’t have any empty scene buttons remaining)
Note
When making a scene on the RØDECaster Video, be aware that it isn’t saved until you press-and-hold one of the empty scene buttons and the “Scene Saved” text displays on-screen. You can still use a scene without saving it, but it will be lost if you switch away.
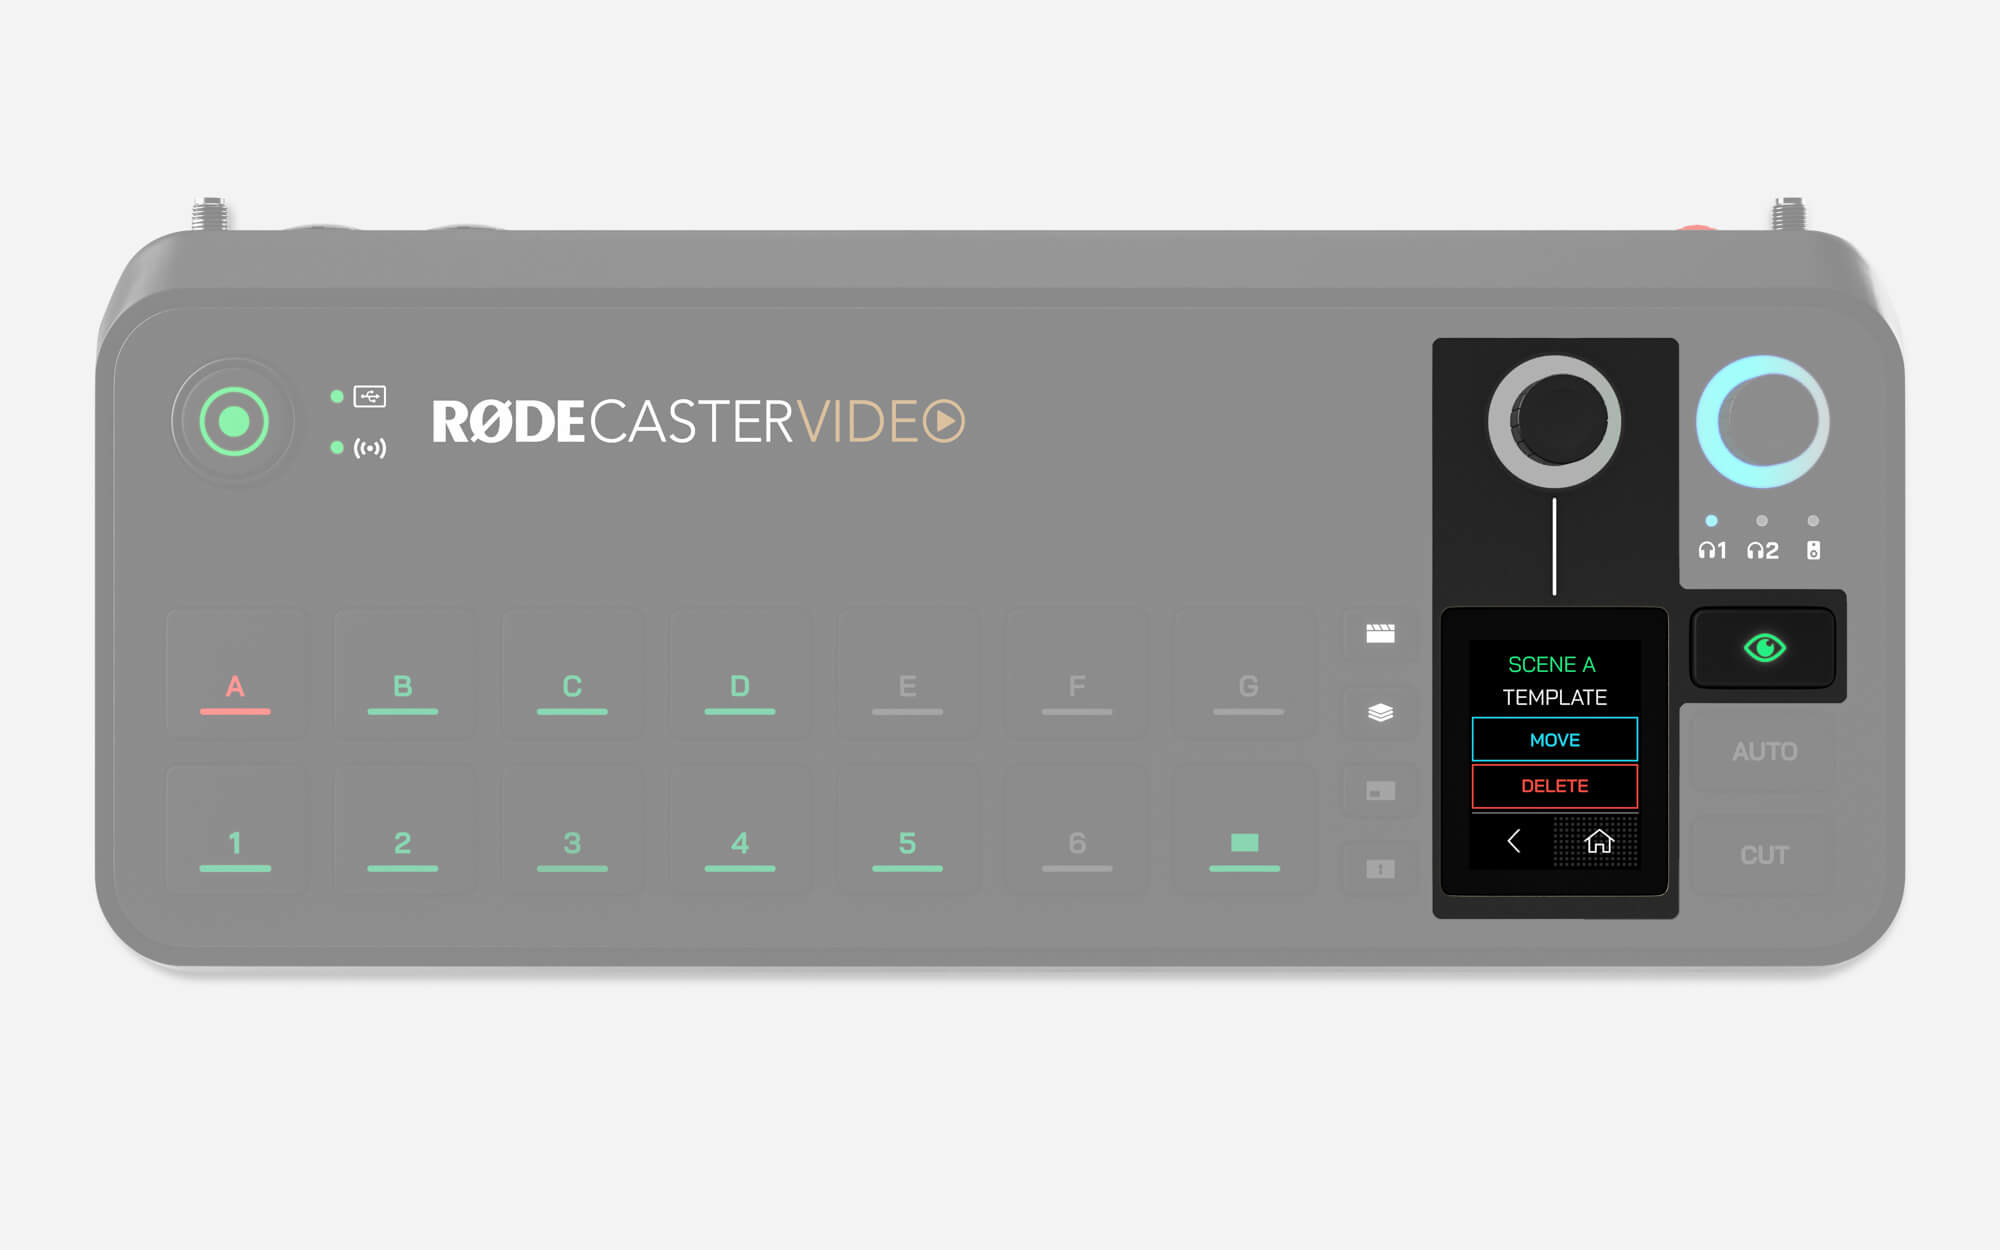
Deleting or Moving a Scene on the RØDECaster Video
Press the Inspect button and then the scene button you wish to delete or move. Next, tap the menu icon in the bottom-left of the screen, then either delete or move. If you tap Delete, you’ll be asked to confirm your choice, and if you tap ‘Move’, you’ll be asked to press another scene button to move to. If your destination scene button already has a scene assigned to it, your two scenes will swap places.
When you’re making a scene on the RØDECaster Video, just be aware that it isn’t saved until you press-and-hold one of the empty scene buttons and the “Scene Saved” text displays on-screen.
RØDE Central Scene Builder
With your RØDECaster Video on the same network as your computer, or connected via USB 2, open RØDE Central, select your RØDECaster Video from the left-hand menu, and open the "Scene Builder”.
We’ll cover the Scene Builder and its various functions in detail below.
Remote Control and Interface
You’ll notice that the bottom-centre of your Scene Builder is laid out just like your RØDECaster Video’s interface. Every action you take within the Scene Builder will instantly reflect live on your RØDECaster Video, even over Wi-Fi, which means you can remotely control your RØDECaster Video using these buttons – this includes building and switching between scenes, enabling overlays and chroma keys and more.
Output Display
At the centre of the Scene Builder is a live video feed from your RØDECaster Video. If you are in Instant mode, this will be the Program feed, while in Studio mode it is the Preview feed. You can tell which feed it is by checking for either PGM or PVW above and to the right of the output display.
-2640x1515-ee647f4.jpg)
Saving and Loading Shows
At the top, you should see the words “Default Show” – this is the name of your current Show. You can use Shows to quickly save and load all your settings at once, including all seven of your scenes. Clicking on the logo for your show lets you rename it, change its logo, export it to your computer or import a Show you’ve previously created.
-2640x1515-70b6ea9.jpg)
Loading and Using Media
On the left-hand side is your media library, which houses all the image, graphic, video and sound files on your microSD card. Import files by clicking “Add Media” and browsing for PNG, JPEG, WAV, MP3 or MP4 files on your computer. A maximum resolution of 1920x1080 is accepted for image files and video files need to be exactly 1920x1080.
Once in your media library, you can assign these files to one of your seven media buttons by clicking the Media function button (so that it lights purple) and then dragging your file onto one of the media buttons (A-G).
Once your Media buttons have media assigned to them, you can adjust certain settings, such as whether a video plays once or loops, and the start, end and fade times for audio files. Now, you can switch to these media files in RØDE Central or on your RØDECaster Video just like you would a camera, and you can use them in your scenes in the same way.
Switch To
There are three playback options available for video files: Once, Loop and Switch To. The Switch To option allows you to automatically switch to another input, scene or piece of media when your video ends. Simply select Switch To and then choose the input, scene or media from the dropdown.
Note
Switch To will follow your current global transition settings. If, for instance, you have a 2-second transition set up, your video will start switching to the next input when it has 2 seconds remaining.
-2640x1515-0f67b0b.jpg)
Loading and Using Overlays
You can use either JPEG or PNG files as overlays in your shows, although if you’d like to make use of transparency (such as with logos, titles or lower-thirds), then you’ll need to use PNG files that support transparency (or “alpha channels”).
Import these files by simply clicking “Add Media” and browsing for the files on your computer. Once in your media library, you can click the Overlay function button (so that it lights blue) and drag these files onto any of the seven buttons (A-G).
With an overlay selected, you will see the option to adjust its “Size & Position”. Clicking this allows you to drag any of the four sides of the overlay to crop your frame, drag the corners to resize your frame and click-and-drag within the image to change the overlay’s position. You can fine tune its XY coordinates, width and height with the menu bar that appears below your Overlay on-screen, and the button to the far left of this bar allows you to reframe your crop.
When enabling an overlay, it will appear over the top of your live Program feed until you disable it again. This is perfect for titles, logos, lower-thirds and similar graphics which you want to remain on-screen, even if you’re switching camera angles beneath it.
Overlay Transitions
Under the Transition dropdown in your Overlay’s settings panel, you can select either Cut or Fade. Cut will enable or disable your overlay instantly when triggered, while fade will fade it in or out over time. You can set this time with the setting to the right of the dropdown, and this behaves entirely separately to other Overlay transitions and the global transition setting.
Scene Audio
Scene Audio is a feature that allows you to automatically mute any of your audio channels when switching to an input, scene or media button.
- Open the RØDE Central Scene Builder
- Select which input, scene or media button you wish to apply Scene Audio to
- Under the Scene Audio dropdown on the right-hand side, toggle off whichever audio channels you would like muted
Note
To differentiate between an audio channel muted by Scene Audio or by traditional mute, the icon will be amber rather than red. Scene Audio mutes will be overruled by manual mutes.
Building a Scene in RØDE Central
To start, click on any of the empty scene buttons, ‘A’ through ‘G’ – this is where your scene will be saved. From the right-hand menu, choose to either start with a template or build your own custom layout.
-2633x1511-698fa2d.jpg)
Templated Scene
Click “Template” and then the Layout dropdown to select your templated layout. The templates available in this menu are the same ones you can access directly from the RØDECaster Video, including picture-in-picture, split screen and a few more creative choices.
Once you’ve chosen a layout, you’ll see these bars beneath it with letters – A, B, C, D and BG (for background). These are the individual frames that make up a scene. Hovering over these frames will highlight their position in your main display, and clicking on them will allow you to assign an input (1-6) or Media from your library to the frame. You can also click-and-drag media from your library onto a frame to load it.
-2640x1515-2c07c25.jpg)
Custom Scene
Much of the process for creating a Custom scene is the same as the templated approach above – the main difference is that you create your own frame layout before assigning inputs and media to each frame.
In the right-hand menu, you can click a “+” button that will allow you to add more frames to your scene until you have as many as you need. Beneath the plus button, you’ll see frame bars which you can hover over to delete your frame (using the trash can icon) or select the input or media for your frame (using the swap arrows icon). Click-and-drag on the left-hand side of these frame bars to re-order them – this lets you place certain frames in front of or behind others.
With a frame selected, you can resize, reshape and move them around using the Output Display. You can click-and-drag the corners of a frame to scale it while maintaining its aspect ratio, or you can drag the edges to crop your frame. Clicking-and-dragging from the middle of the frame allows you to move its position around the screen.
You can fine tune a frame’s XY coordinates, width and height with the menu bar that appears below your frame on-screen, and the button to the far left of this bar allows you to pan the cropped section of the source. shift the crop of your frame.
Once you’re happy with the size and placement of your frame, you can move onto the next one and repeat the process until you’ve got a completely custom layout.
Saving Your Scene
Once you’ve finished customising your scene, it’s ready to use – there's no need to save it as it’s all done on the fly. You can click ‘Reassign’ if you want to move your scene to a different Scene button, but otherwise, you can simply start switching to and from your new scene.
If you’ve built a number of scenes you’d like to keep using in the future, we recommend giving your Show a name and exporting it to your computer.