Recording and Streaming
External Hard Drives
The RØDECaster Video supports external hard drives and other USB mass storage devices connected to USB 3, allowing you to record high-quality video and audio directly to your drive.
Your hard drive will need to be in the ExFat storage format. If it isn’t, back up any files from your drive onto your computer, connect the drive to your RØDECaster Video, and then navigate to Settings > Storage > USB Storage and tap "Format”.
Isolated (ISO) Video Recording
The RØDECaster Video supports Isolated Recording (ISO), which allows you to record each of the 6 video inputs separately. This feature is perfect if you would like to live switch your show and make adjustments later, whether it’s tweaking switch timing or applying different edits to each of your cameras’ footage.
To enable ISO recording, navigate to Settings > Multitrack > REC Video and select ISO, or in RØDE Central go to Device Configuration > Video > Recording and toggle the ISO setting on.
Program Quality
You can choose to record your Program feed in either “Normal” or “High” quality, with different bit-rates suiting different uses. If you plan to upload directly to YouTube or other platforms, or just want a smaller file size, then the Normal setting is more than enough. If you plan on doing more editing with your program recording, then the High mode will give you maximum quality for maximum flexibility – this setting records in the same high bit-rate as your ISO recordings.
-2399x1435-0280e3d.jpg)
Multitrack Audio Recording
The RØDECaster Video is able to record your audio either as a single stereo audio file or as individual tracks for each input when multitrack mode is enabled. Access this setting by navigating to Settings > Multitrack > REC Audio on the RØDECaster Video, or Device Configuration > Audio > Multitrack > Recording.
Toggling Multitrack on allows you to select “Pre-fader", “Bypass DSP” or “Post-fader".
Pre-Fader: The position of the audio channel’s virtual fader will have no effect on the audio being recorded (i.e. even if faded down, it will still be recorded at unity gain).
Bypass Processing: Identical to “Pre-Fader”, except none of the processing and effects will be applied to your recorded audio.
Post-Fader: The virtual fader’s position will affect the recorded audio – it will record quieter or louder depending on the fader’s position.
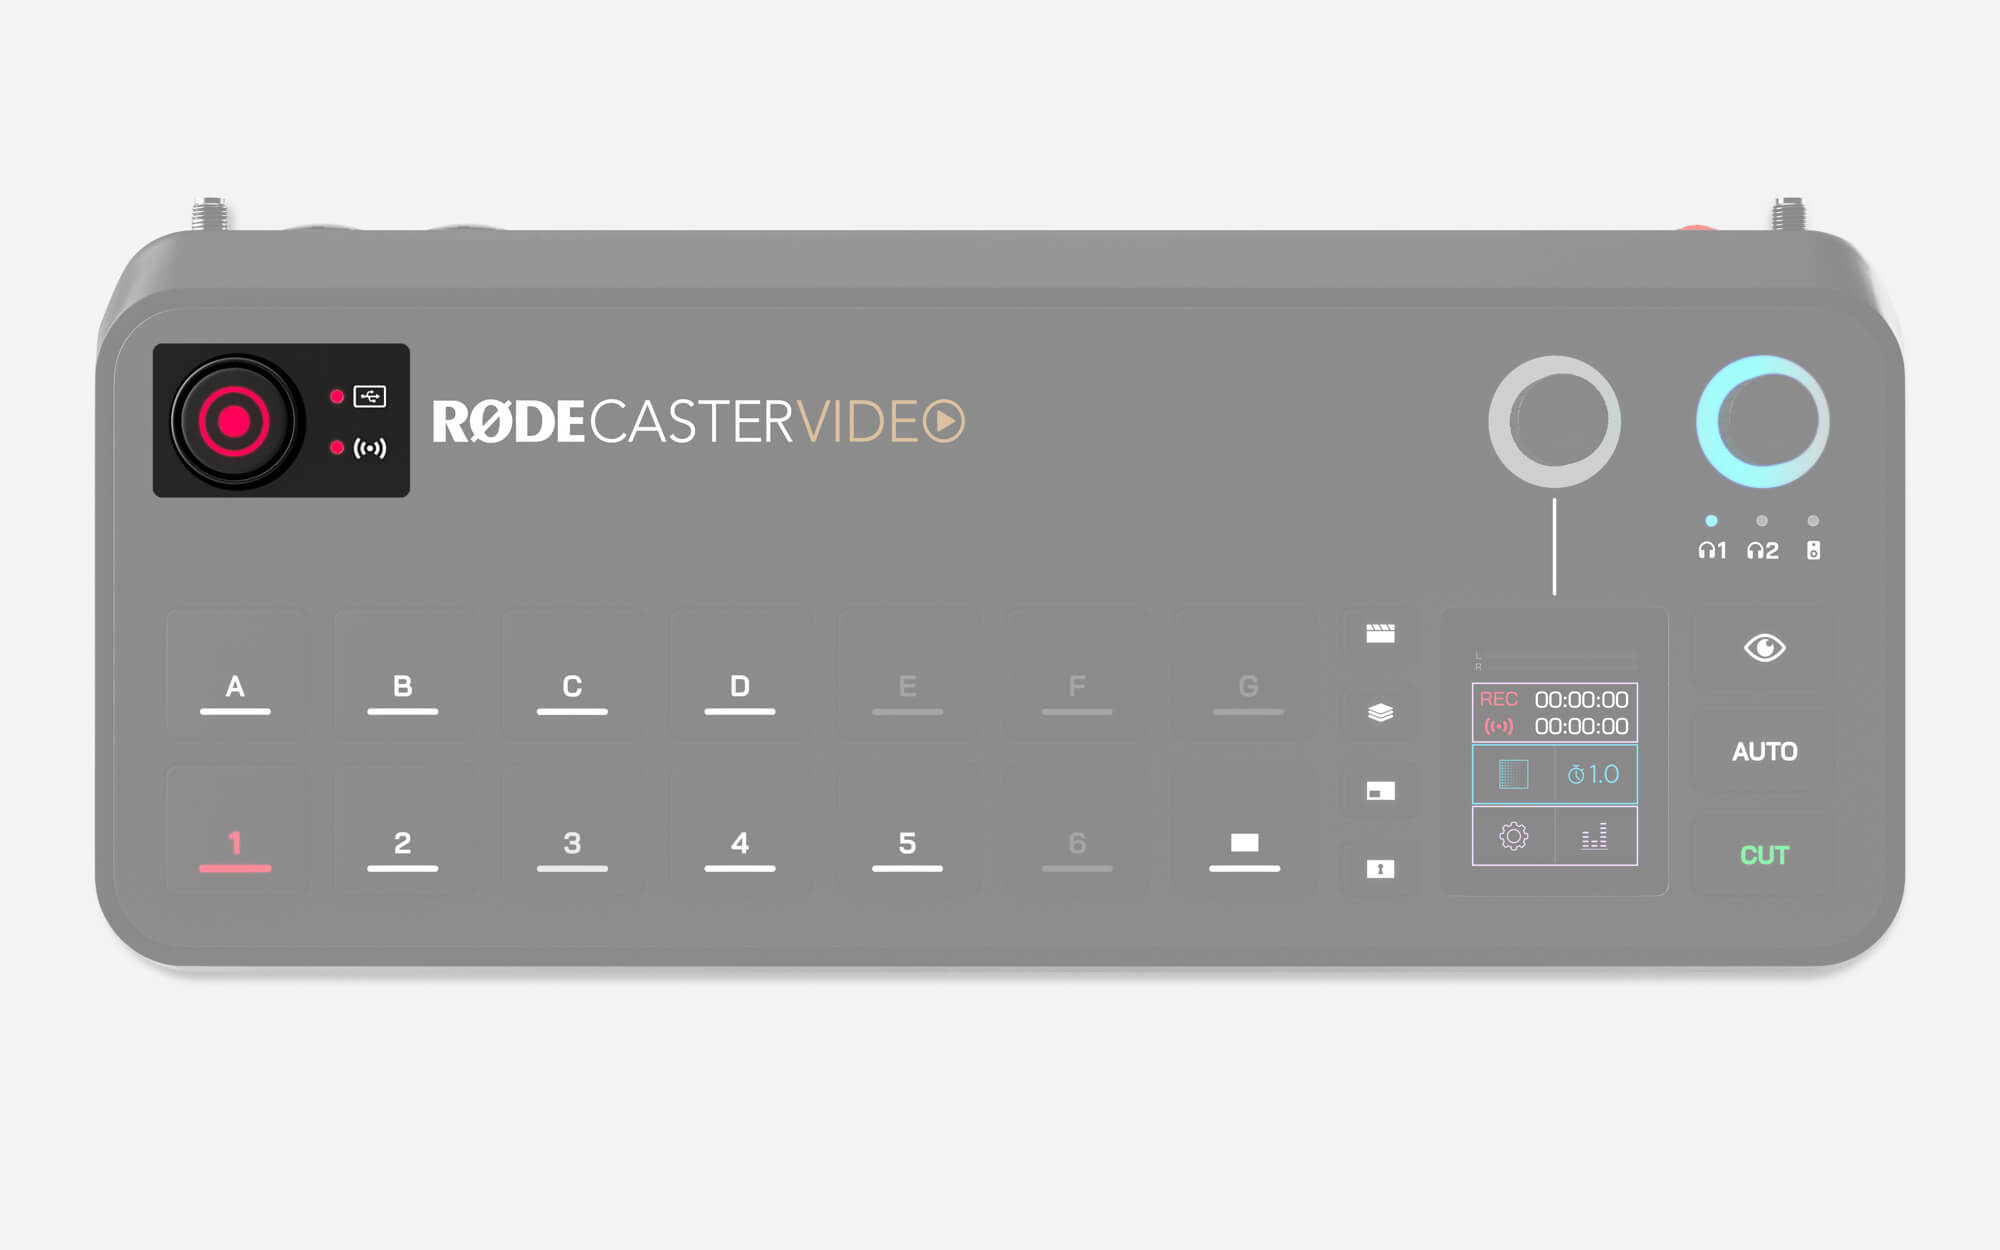
Record Button and Storage/Network Indicators
The record button is used to start and stop recordings. Both the record button and the storage indicator LED next to it will be lit green when ready to record and red while recording. If either is unlit, it means that you do not have a compatible USB storage device connected to USB 3, the device is not formatted to the correct exFAT format, or the device has run out of free space.
Similarly, the Network indicator LED will be lit green when ready to stream, red while streaming, or unlit if the RØDECaster Video is not ready to stream. This means that you have not set up a stream profile on the RØDECaster Video, or it is not connected to the internet.
Live Streaming
To live stream directly from the RØDECaster Video, you’ll need to connect it to your network via Wi-Fi or Ethernet and then use RØDE Central to create a stream profile and enable it on your RØDECaster Video.
-2390x1430-6a7465a.jpg)
Creating a Stream Profile
With your RØDECaster Video on the same network as your computer, open RØDE Central, select your device from the left-hand side, and then open the Stream Profiles menu. Here you can create, enable, edit and delete your stream profiles as well as adjust their quality settings.
To start, click “Add Profile” and give it a name. Next, enter the server and stream key from your streaming platform then hit Save. If you don't have your server and stream key info handy, see below for a quick guide on how to find these details with a few popular streaming platforms.
Note
It’s important to note that your stream key is unique to your account, so treat it like a password and don’t share it around.
Server and Stream Key
YouTube: Sign into your account and go to the YouTube Studio dashboard. Click “Create” and then “Go Live” from the dropdown in the top-right of the page. On the Stream page, you’ll see a “Stream Settings” tab. Here, you can see your Stream Key and a Stream URL field that you can copy and paste into RØDE Central.
Twitch: Sign into your account and go to “Settings” and then “Stream” in the “Creator Dashboard” menu on the left. Here you’ll find your stream key, which you can copy and paste into RØDE Central. To find the best server address for you, visit Twitch’s “Ingest Recommendation” web page.
Facebook: Visit the “Facebook Live Producer” page and log in, then select the destination you want to stream to from the sidebar on the left. Click “Stream Setup” and you will find your Stream Key and Server URL, which you can copy and paste into RØDE Central. It’s worth noting that Facebook Live will reset your Stream Key automatically if you log out, so if you’d like to keep using the same key, select “Persistent Stream Key” in the settings.
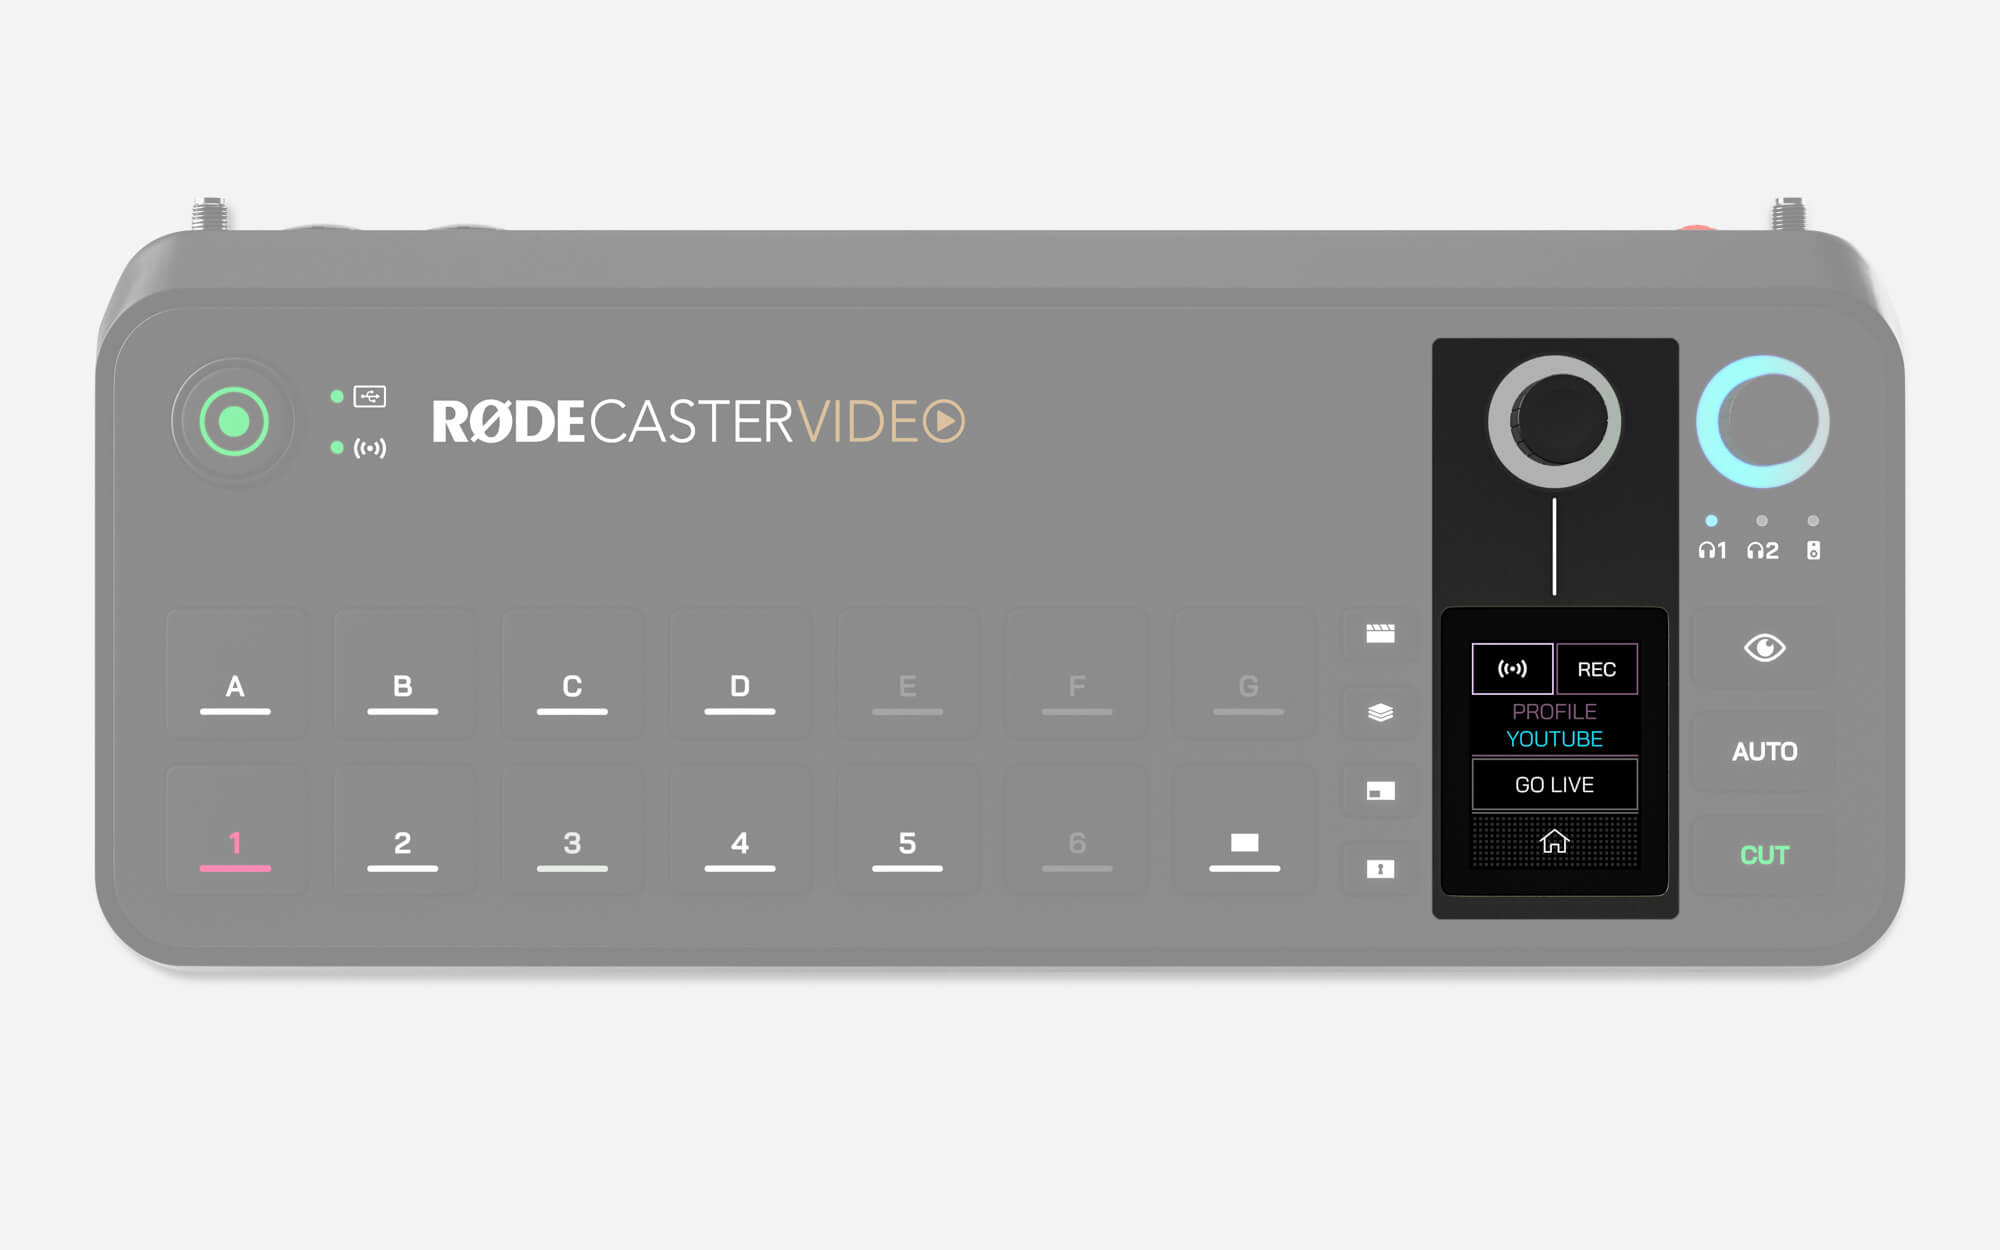
Going Live
To go live with your RØDECaster Video, tap on the section of the home screen below the audio level meters. Here you can select a stream profile (if not already selected) by tapping ‘Profile’ and then using the encoder to make your selection. If your RØDECaster Video is successfully connected to a network (via Wi-Fi or Ethernet), and a Stream Profile is loaded, the network indicator LED will be lit green.
When you’re ready to go live, simply tap “Go Live” and confirm with the green tick. To end your stream, head back to the same menu and instead of “Go Live”, the button will show your elapsed runtime. Tap this button and confirm with the green tick to end your stream.
Note
If the network LED isn’t lit green, check your network settings in Settings > Device > Network, or in RØDE Central, under Device Configuration, System, then Network.